Trading Places with Tom Bowley April 29, 2015 at 02:04 PM
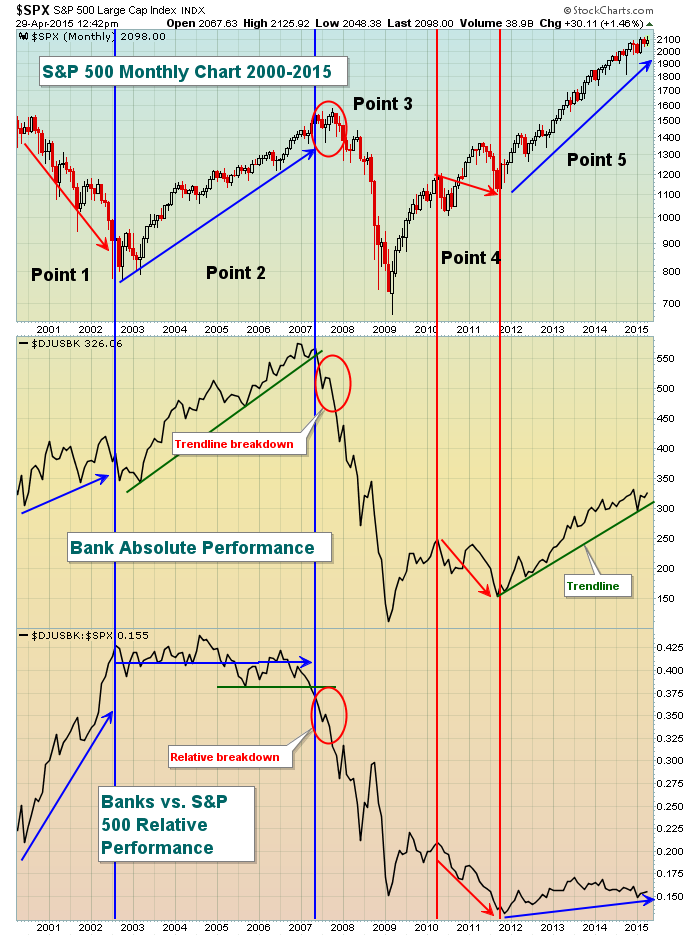
I've discussed price action (duh!), the relative performance of aggressive sectors and defensive sectors vs... Read More
Trading Places with Tom Bowley April 27, 2015 at 02:41 PM
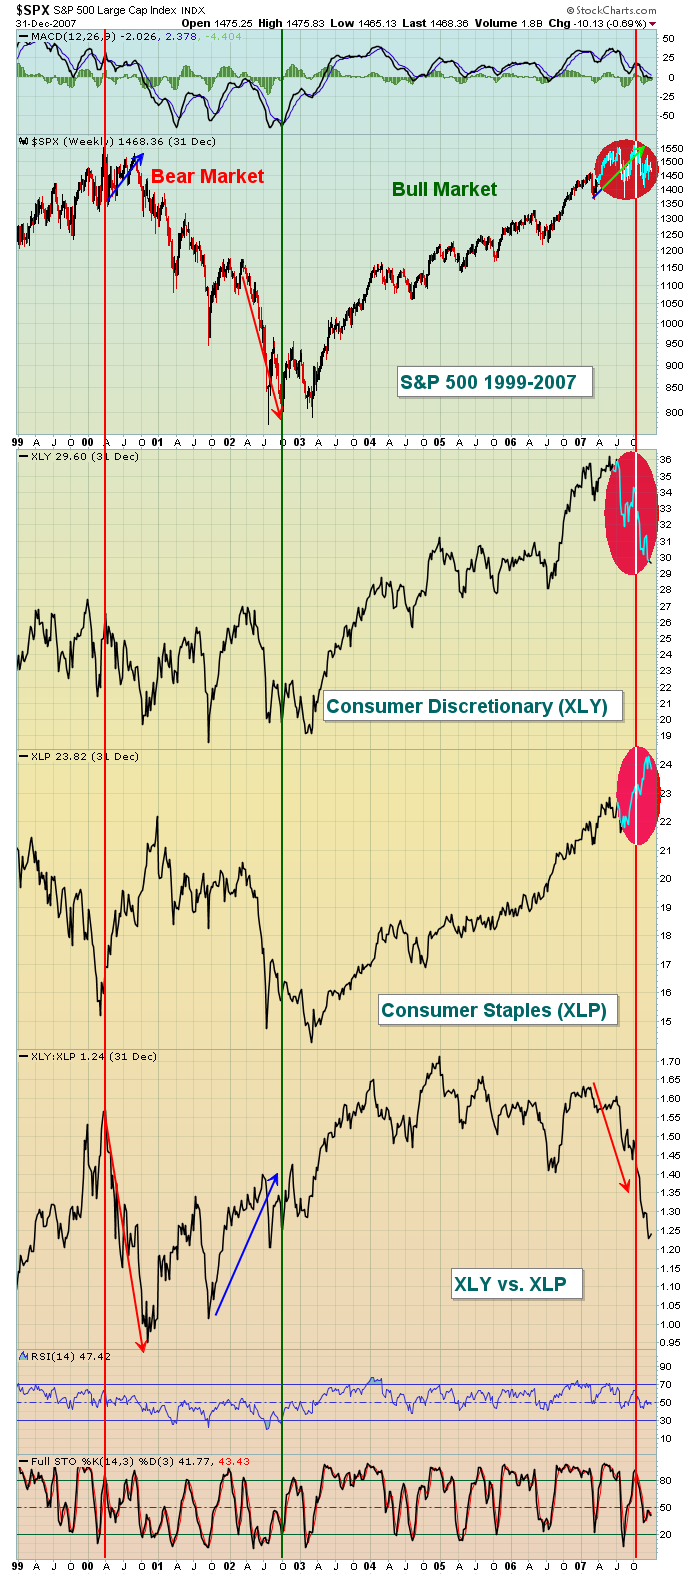
When evaluating the stock market for a potential top, there's another intermarket relationship that seems to provide us a nice clue. So without further hesitation, let me move on to my third area of the stock market to watch: 3... Read More
Trading Places with Tom Bowley April 24, 2015 at 10:57 AM

On Wednesday, I began a series of blog articles that is designed to evaluate the health of the stock market... Read More
Trading Places with Tom Bowley April 22, 2015 at 11:43 AM
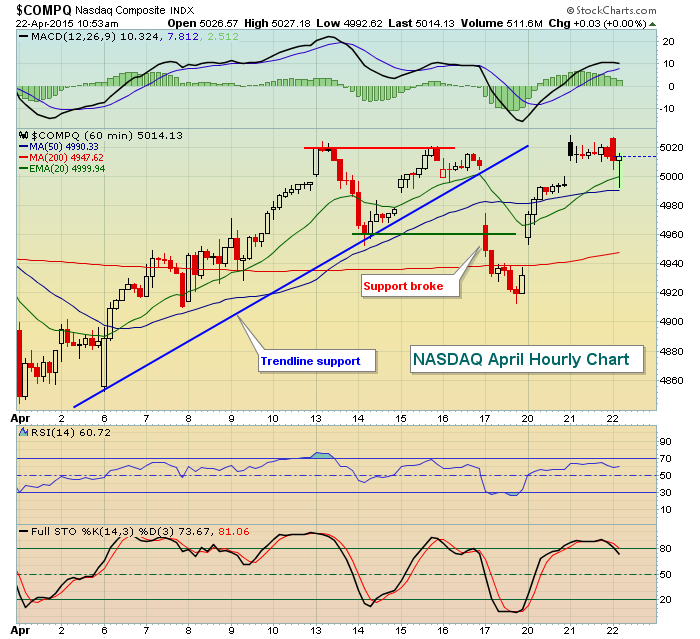
Wow, this is a loaded question and it will take a few articles to try to address it. For every bear market, we seem to have a different reason... Read More
Trading Places with Tom Bowley April 20, 2015 at 09:33 AM
Perhaps one of the biggest mistakes we make is to misinterpret normal stock market rotation as a predecessor to a bear market. During a bull market, money rotates from sector to sector, from industry group to industry group and from stock to stock... Read More
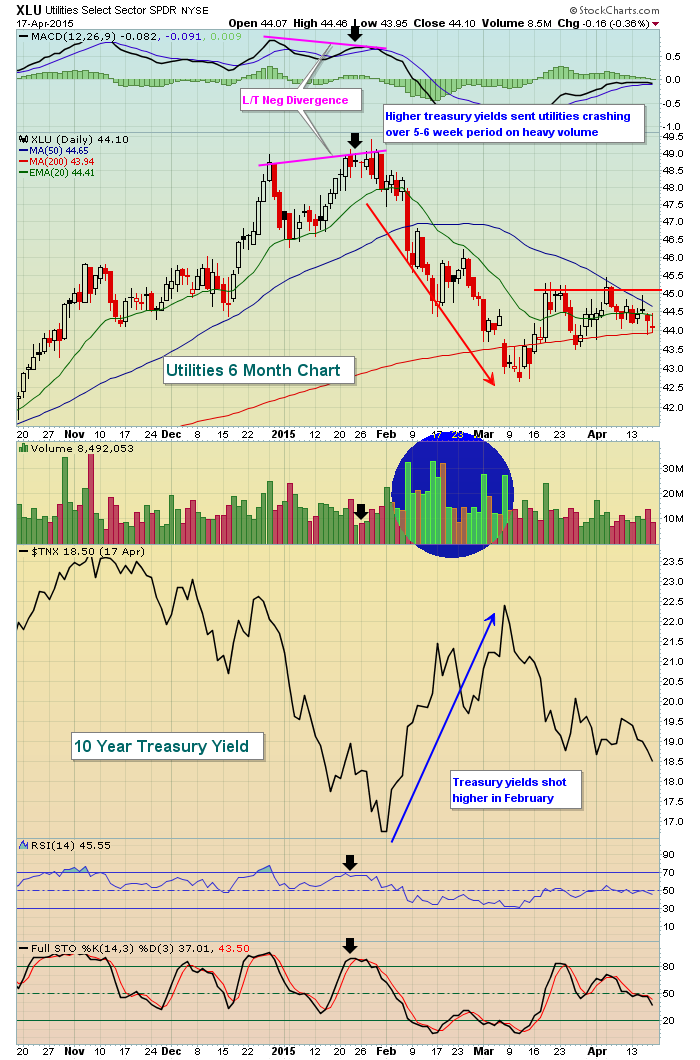
Trading Places with Tom Bowley April 17, 2015 at 10:48 AM
From a technical perspective, the StockCharts Technical Rank (SCTR) makes a TON of sense. It's a very quick way to see how a stock is performing relative to its peers (ie, large cap, mid cap, small cap)... Read More
Trading Places with Tom Bowley April 15, 2015 at 10:37 AM
Better than expected earnings and technical price action follow through is perhaps my favorite combination when trading a stock... Read More
Trading Places with Tom Bowley April 13, 2015 at 09:10 AM
Most everyone knows that Uncle Sam is waiting anxiously for April 15th to arrive. Don't look now, but it's almost here! Even if you decide to extend the filing date for your tax return, any balance due must be paid now. The payment generally cannot be extended... Read More
Trading Places with Tom Bowley April 10, 2015 at 09:42 AM
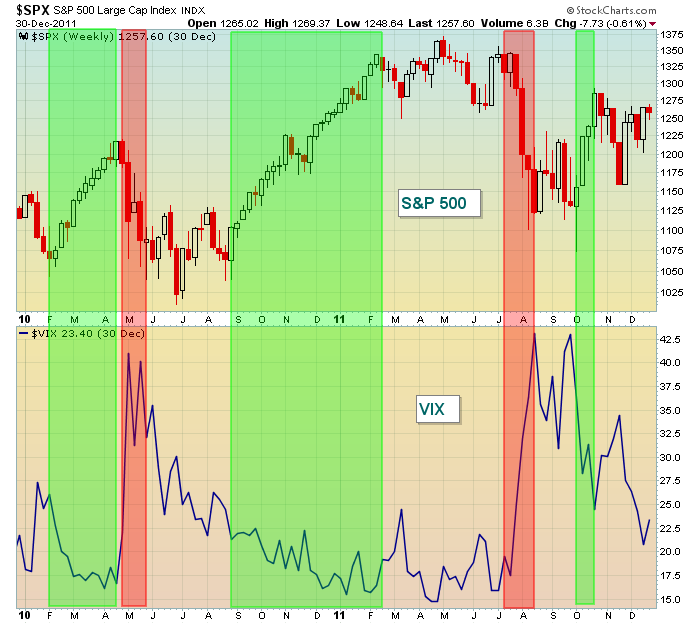
The volatility index ($VIX) charts the implied volatility of S&P 500 index options. It's a sentiment indicator that measures the stock market's expectation of volatility over the next 30 day period... Read More
Trading Places with Tom Bowley April 07, 2015 at 10:10 AM
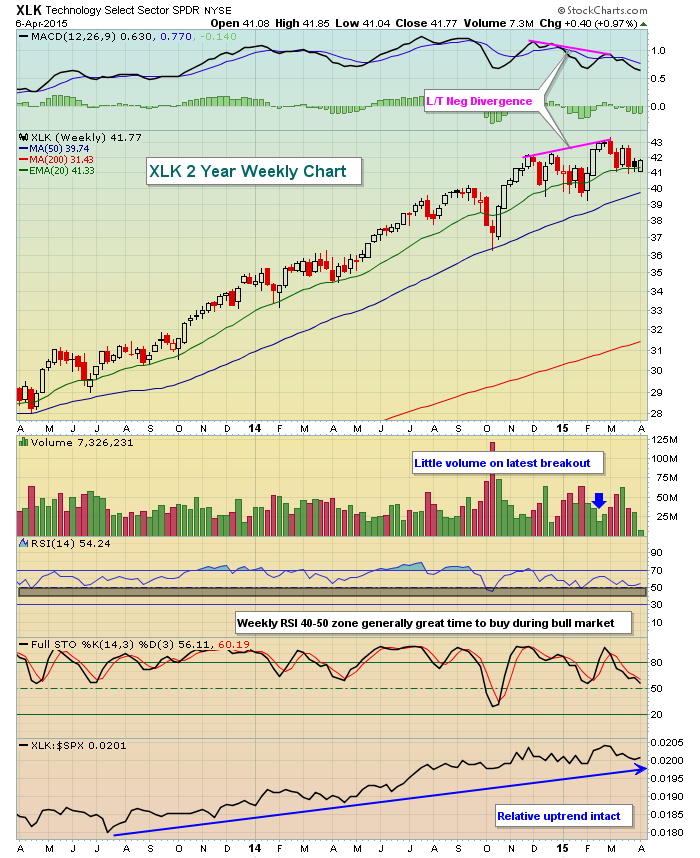
Technology stocks have been lagging throughout 2015. One of the primary reasons for their uninspiring performance has been the underwhelming action in the Dow Jones US Semiconductor Index ($DJUSSC)... Read More
Trading Places with Tom Bowley April 03, 2015 at 10:23 AM
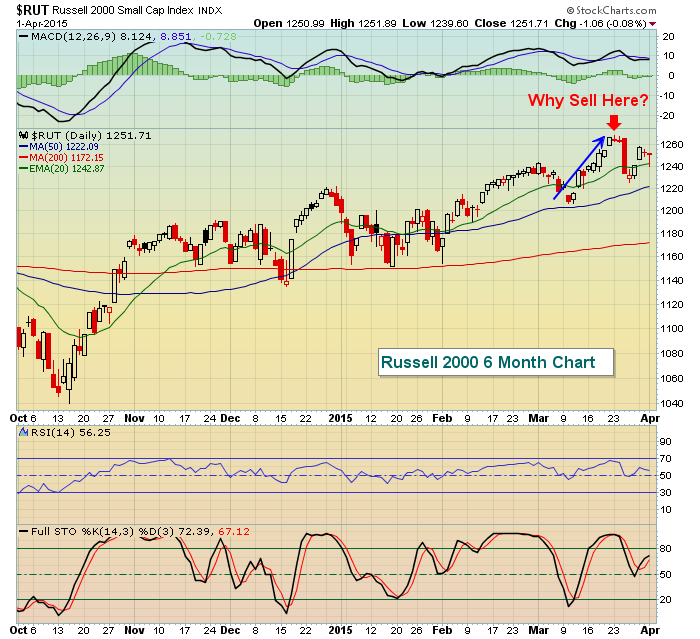
Generally, I review my trading positions on a stock by stock basis. If I've hit my target on one, I try to be disciplined and take the profits - or at the very least partial profits. If my stop loss has been triggered, it's time to take the loss, lick my wounds and move on... Read More
Trading Places with Tom Bowley April 02, 2015 at 09:31 AM
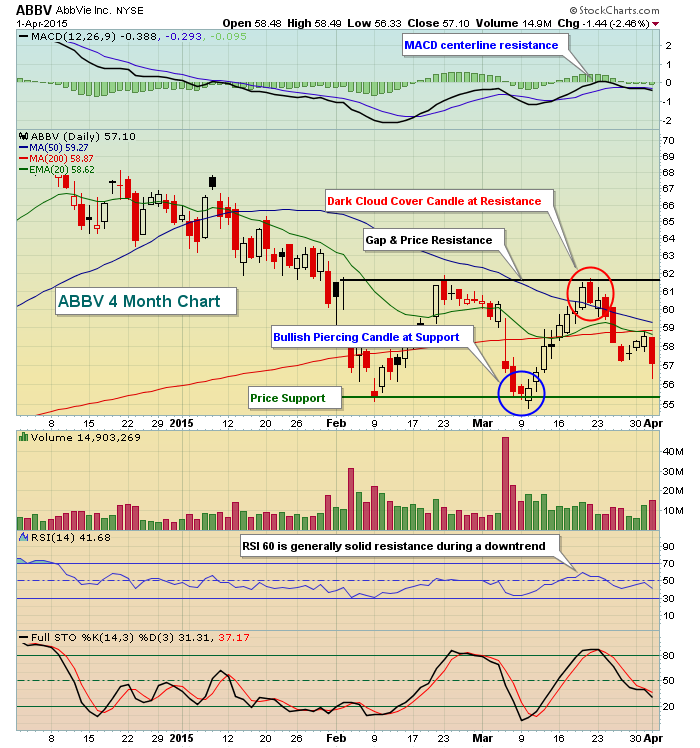
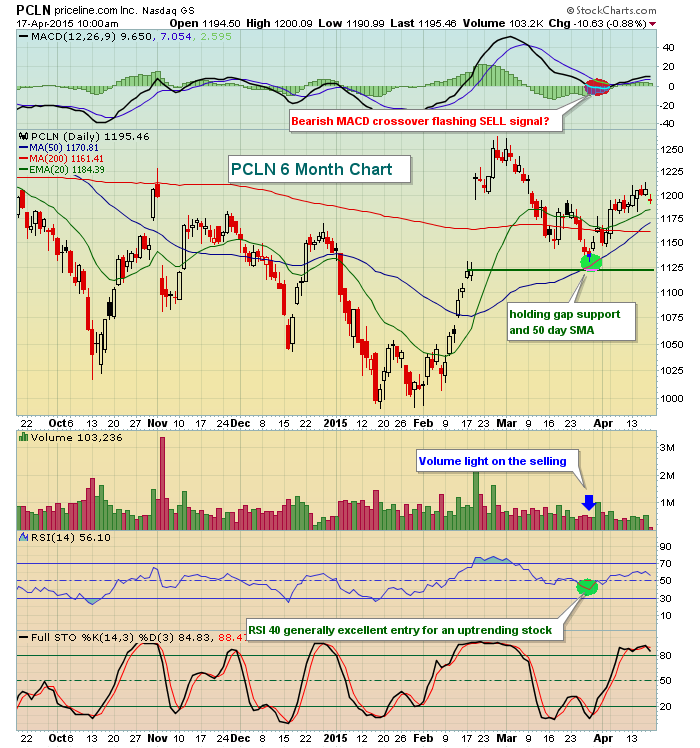
I discussed how using the MACD in concert with price/volume can be instrumental in making a high probability exit in Parts 1 and 2. Today, I want to focus on candlesticks. I'm a fan of Steve Nison's and have read his books on candlesticks... Read More
Trading Places with Tom Bowley April 01, 2015 at 10:43 AM

Let's continue the discussion from yesterday. Broadcom (BRCM) had fallen back in late January to test both price and multiple gap supports, with an intraday move beneath both that suggested we could be witnessing a breakdown... Read More